Thursday, September 22, 2011

Mushroom Alfredo

Official Business: I just updated the URL for Wonderland Kitchen, and you can now get here from AlexsWonderlandKitchen.Blogspot.Com. I'm not sure if this affects anyone following via the Google Reader, but just wanted to let everyone know!


I never liked Mushrooms before this year. I could tolerate them if they were cut up really tiny in something, or if I didn't know they were there, but I just had a general distaste for their slippery texture. (Yes, 9 times out of ten it is the texture and not the taste that makes me not like a food) On my New Years Resolution of "trying new things" primarily where food is concerned, I ordered a Mushroom Alfredo dish at Mama Carolla's in Indianapolis. OH MY GOD was it good. It was really finely chopped and super creamy and smooth, and SO GOOD. I knew I had to make it for myself. I think this was the start of my mushroom acceptance.

While I have never figured out quite how their sauce was so grey or hit it quite on the head, I've made about a million different versions and they're all pretty good. Another benefit: it's pretty hard to mess up. You can use just about any kind of mushroom, any kind of seasoning, any kind of meat/pasta combination... you get the gist. Here's a recipe for the most recent version I did using Pancetta. This can be substituted with bacon, or if you don't want to use that at all you can just add a little bit of olive oil to the butter when you saute the mushrooms/garlic/onion.

Ingredients
1/4 lb diced pancetta (or bacon)
1/2 cup diced white onion
1 1/2 cups mushrooms of your choice
(I've used baby bellas, button, shitake... pretty much anything works)
2 Tbsp butter
1 Tbsp minced garlic
1 Cup heavy cream
1/2 cup shredded parmesean or Italian Mix cheese
Chili Powder
Salt and Pepper
Pasta of your choice
(I prefer any with more shape than just spaghetti/linguini to let the sauce get into all the little crevices. We used fresh Rigatoni from our local Italian market.)

Start by cooking the diced Pancetta or bacon in a skillet. If using Pancetta, keep in mind that it doesn't get quite as brown as bacon and don't overcook it or it will burn! Pancetta usually leaves less grease too, so just leave the drippings in the skillet. If the bacon leaves enough where you can easily spoon it out, remove some and leave just about a tablespoon in the pan.

(Now is also a good time to get your water boiling for the pasta in a separate pot.)


Add the butter to the skillet (and olive oil if you're not using the pancetta/bacon). Put the mushrooms in and let them cook for a few minutes. During this time you can dice the onion and then throw it in. Add the garlic. Cook until mushrooms become "squishy" when touched with the spoon and onions are becoming translucent. It's best if they're soft enough that you can kind of cut through them with the spoon. This generally will take around 10 minutes on medium high heat. About halfway through you'll want to get your pasta in if you're not using fresh pasta, which only takes a few minutes to cook.


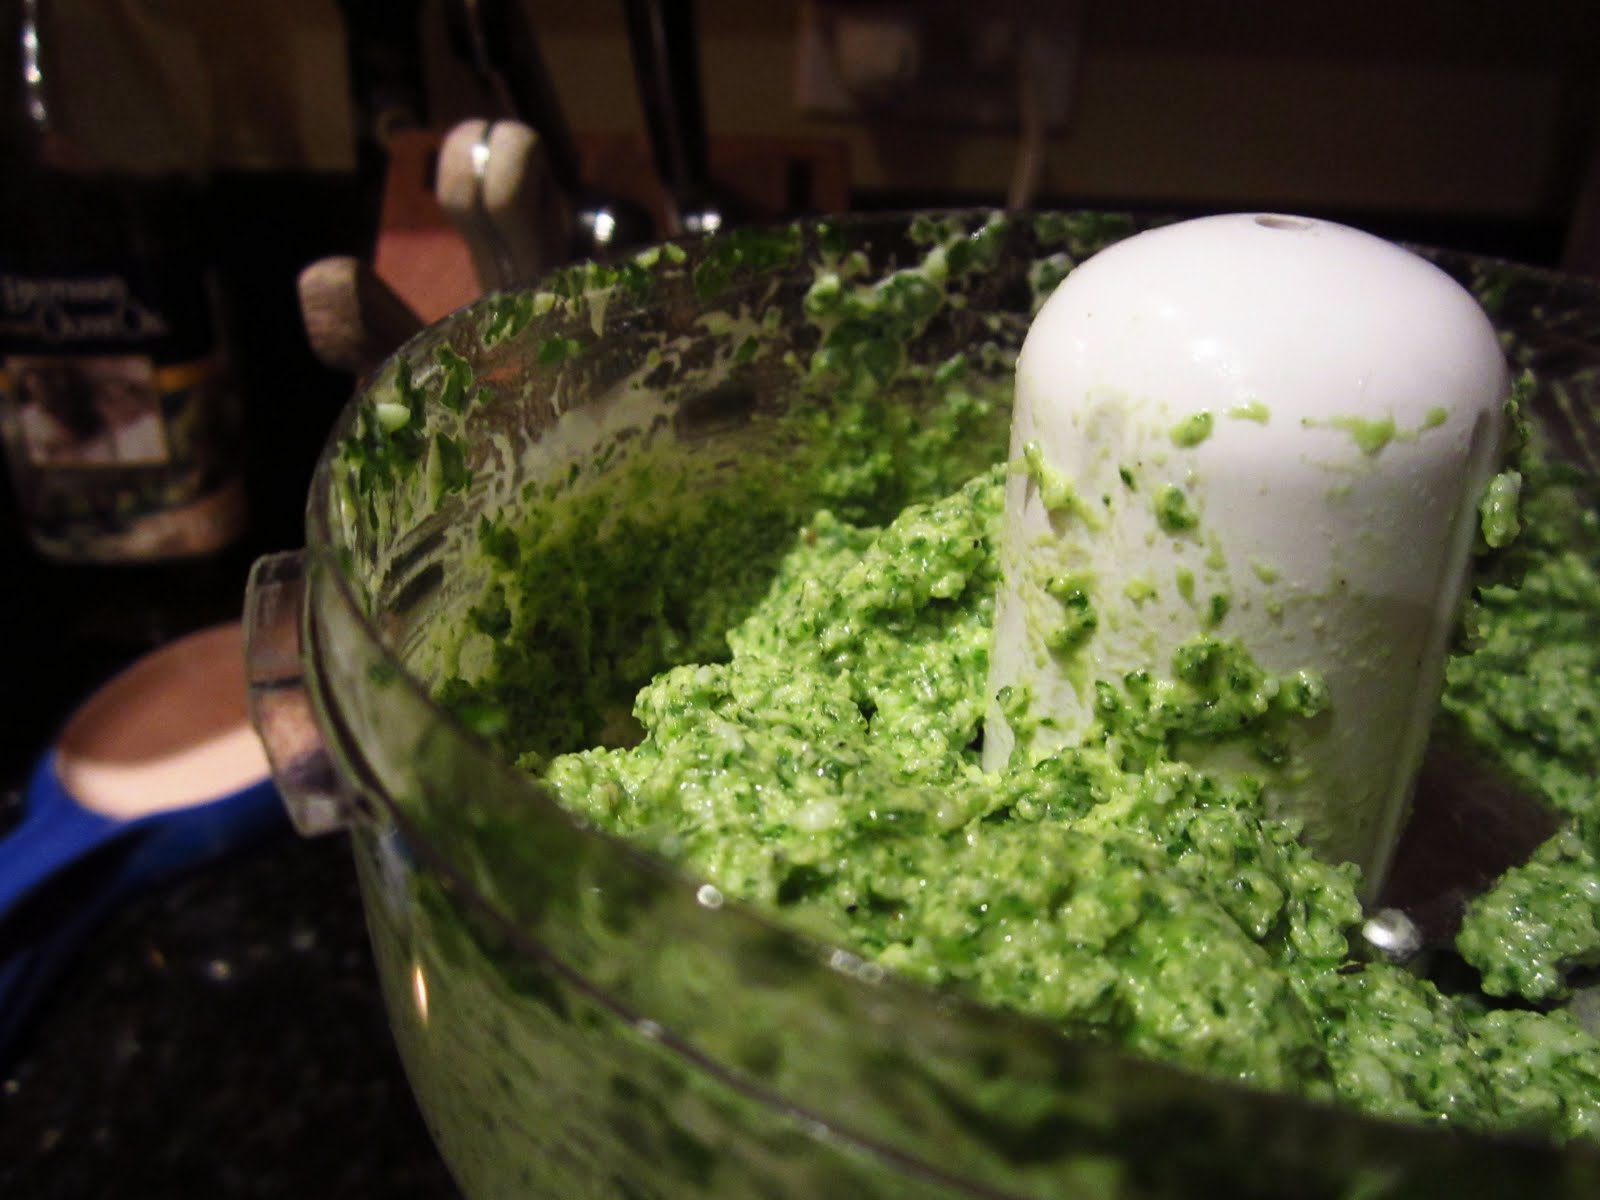
Put the mushroom mixture into a food processor. Add about a 1/2 cup of the heavy cream at a time and blend. How much you blend it is really up to you... you can leave it chunky or keep breaking it down until it is more smooth and creamy. The color of the mixture will vary depending on the type of mushrooms you use. Add more of the heavy cream if necessary.


Once broken down to your preference, return to the skillet and add remaining heavy cream. You can always add more heavy cream than listed in the ingredients to get it to a consistency of your choosing, just add a little bit at a time to make sure it doesn't get too thin. Cook on medium-low heat while stirring for a few minutes, then add the 1/2 cup of cheese and mix in. At this point you can add salt and pepper to taste, and the same with the chili powder if you want to give it a little bit of an extra kick. I also added about 2/3 of the pancetta and mixed it in, leaving the rest for garnishing.


Add the pasta to the mixture and stir to evenly coat.


Plate the pasta and garnish with extra shredded parmesean/italian mix cheese and pancetta.


ENJOY!

Tuesday, September 20, 2011

Arugula Asiago Pesto and More Must-Tries


It's that time again. I find a must-have-immediately recipe on How Sweet It Is, make it, post pictures, and tell you how good it is while wondering why anyone in their right mind wouldn't be following her yet. Oh wait, I know- because just about every post she does is must-have-immediately which isn't always great on the waistline... but just about always good on the taste buds.

So let's mix it up today. Here are some pictures of the Arugula Asiago Pesto from How Sweet (that I actually made weeks ago, several times within a few days, and have just forgotten to post about) along with the link to that and a few other recipes I'm dying to try. The Arugula Asiago Pesto itself is SO easy to make. SOOOOO easy. I love pesto but was always under the impression it was more difficult to make. This is the fastest thing to throw together on pasta, and the flavor combination and the way the Asiago melts when combined with the warm pasta... Yum!


I just sauteed bite-sized chicken pieces tossed in a mixture of flour, salt, pepper, and spices of your choice (Rosemary, Oregano, Chili Powder, Garlic Powder, anything Italian- all good options. Hell, use them all at once!) in some olive oil and minced garlic until cooked through and then tossed them on top of the pasta. Super easy way to cook chicken- I do this to add to more meals than you could even imagine.

How Sweet It Is- Arugula Asiago Pesto

Lemons and Anchovies- Potato Broccoli Soup

The Comfort of Cooking- Basil Pesto Potato Salad

How Sweet It Is- Roasted Red Pepper Penne

The Way the Cookie Crumbles- Dulce de Leche Cupcakes

Ami's Vegetarian Delicacies- Green Beans Spicy Stir Fry


Do you have any recipes you have seen lately that you are just dying to try? Do share!


Monday, September 19, 2011

Margie's Candies

While a friend was visiting Chicago from St. Louis this weekend, we decided to finally go to Margie's Candies in Bucktown for "lunch" since we had both heard of it and never been. It's a super old fashioned ice cream and candy shop, and was totally delicious.

Sundaes are around $5-$7 and are ENORMOUS. We both got our own, and thank god had not eaten lunch, because neither of us finished them. "Two scoops" is really more like three, and you get an entire side of fudge with your sundae in most cases.


I got the Grandpa's Turtle Sundae, which has two scoops of ice cream (flavors of your choice- I did Chocolate and Praline), caramel, a side of fudge, whipped cream, a wafer cookie, peanuts, a cherry, and a turtle (the candy) on top. It was kind of funny because a family sitting behind us must have ordered one of the turtle sundaes and upon receiving it loudly proclaimed "WELL THIS DOESN'T LOOK LIKE A TURTLE AT ALL!" It might not have looked like a turtle, but it was really good.

"Sooooo full!"

If you're looking for ice cream in Chicago, a fun family outing, or just have an incredible sweet tooth, definitely check this place out.

Wednesday, September 14, 2011

Paula Deen's Biscuits

Break out the butter, we're making some Paula Deen biscuits, ya'all!

(Oops. Didn't actually get any pictures until most of the biscuits had been put onto plates.)

I've been wanting to make home made biscuits for a while, but I always thought it would be more complicated than it actually was. I think I just tend to avoid bread because of the thought of yeast, or kneading, or letting it rise, or anything along those lines. This recipe from the Food Network was actually really simple.

Ingredients

2 Cups all-purpose flour
1 tsp sugar
1 Tbsp baking powder
1 tsp salt
8 tablespoons butter, cubed (the tinier the better!)
3/4 cup milk

Directions

Preheat oven to 350 degrees F.

Combine all dry ingredients in bowl and mix together. Cut butter into mixture until it is fairly spread out throughout the flour mixture. Don't worry if it's not totally mixed in, I found it was easier to just knead it all together after adding the milk.

Add a little of the milk at a time and knead together, making sure to get all of the flour and work the butter into the mixture.

Flour a section of your (clean) counter, and you can now roll out the dough into the desired thickness and use a cookie cutter to cut biscuits, or just eye ball it and tear off sections. I divided the dough in half and then made four little balls out of each half and kind of pressed them down onto the flour to flatten them out a little bit. The recipe claims that it makes 3 dozen biscuits, but I'm not sure where that came from... you should get 7 or 8 big fluffy biscuits out of it.

Butter a skillet and place the biscuits in the skillet. Bake at 350 degrees for 20-25 minutes. You can brush or drizzle with a little bit of melted butter a few minutes before they are done to get a more golden look to them.

Use as you please! Today I used them for biscuits and gravy. I'd give you a gravy recipe, but I'd be lying if I said I measured out ANY part of that. I will tell you I used a pound of "Hot" ground sausage, milk, flour, a tablespoon of bacon grease, salt, and pepper.

(Biscuits and gravy always taste better than it looks, doesn't it?)

ENJOY!

Tuesday, September 13, 2011

Red Potato Soup


It's officially fall: today I whipped up a big ol' pot of home made potato soup. I had never actually made it before, but I found this recipe for creamy red potato soup and it turned out really well!

I made just a few changes:

*I added a large diced carrot into the mix at the beginning, a little bit extra beyond the 4 cups of potatoes, and about an extra 1/4 cup of chicken broth to make up for the extra ingredients.

*Once I put the pot on to simmer, I started cooking some bacon and then added two tablespoons of the bacon grease into the chicken stock/simmering mixture to give it a little extra flavor.

*I used 1 cup of milk and a 1/2 cup of Heavy Cream instead of just milk. I think this makes it a little creamier and eliminates the need for any flour.

*I only used about 1 cup (half a bag) of the shredded cheese. I think if you have the extra on hand and just use it for garnish, it's plenty.

*I filled up our mini-food processor with a few spoonfuls of the soup AFTER I put the milk in and whipped that. It came out looking like mashed potatoes, and then I put it back in and mixed it up. As suggested in the recipe, using this method helps make it partially creamy and still partially chunky.


Enjoy!

Monday, September 5, 2011

Nutella Stuffed Challah French Toast


I came across some kind of stuffed French Toast recipe a week or two ago, and have been wanting to make my own ever since. The only problem is I generally tend to favor savory dishes more than sweet, so prior to today I hadn't really felt like making it. I'm certainly glad I did. These were totally delicious, easy to make, and ridiculously filling. No, seriously, you'll see later: I had the equivalent of half of what I plated left.

This recipe (as far as the egg mixture goes) is about enough for four slices. Multiply as needed for larger batches.

Ingredients

Loaf of Challah Bread
(Italian, French, whatever works as long as it is soft bread)
2 Eggs
1/4 cup milk
1 tsp vanilla extract
A few sprinkles of Pumpkin Pie spice
Nutella
Butter

Optional: Strawberries or other fruit garnish, syrup


Directions

Slice the loaf of bread into THICK slices. You just want to make sure you have it thick enough so you can easily cut a slit in the flat side and kind of squeeze it open to get the Nutella in without it ripping. (It's not a big deal if the slice gets little holes though.)


Whisk together the eggs and milk. Add the vanilla and a few dashes of the Pumpkin Pie spice. Cinnamon would work here too, but we somehow did not have any and I thought the Pumpkin Pie spice would give it a slightly different twist. It turned out well!

Take the slices of bread after cutting a slit on the flat side and kind of squeeze the ends towards each other with one hand so the hole opens up a little and then use a knife to work the Nutella into the pocket. Use as much or as little as you'd like. You can always drizzle more on top later!


Melt a tablespoon of butter into a skillet (non-stick works best) and make sure it covers the entire pan. Dip your Nutella-stuffed slices of toast into the egg mixture, and make sure to let any excess slide off prior to putting into the pan.

Let slices of bread cook in the skillet for about 3-4 minutes on each side until golden brown and "toasted" for the most part.


Plate the slices and top as you please! I drizzled a little bit of extra Nutella on top, sliced up some Strawberries, and then did just a small drizzle of syrup. In hindsight they would be fine with just the Nutella.


ENJOY!


And see? I was totally not kidding that I had way too much leftover!


Saturday, September 3, 2011

Gorgonzola Pancetta Smothered Chicken

Another How Sweet It Is recipe for you, with a few additions of my own. This combination of flavors is NOT for the faint of... mouth? There are definitely some really strong flavors, and if you don't like Gorgonzola, this may not be for you. I will say, however, that the intensity of the gorgonzola, pancetta (basically Italian Bacon), and arugula work wonders together when combined. And not to mention, this recipe let me use the gorgonzola and pancetta from that amazing little neighborhood Italian Market of ours.

You can find the How Sweet It Is Recipe HERE.

For the flour mixture, I added salt, pepper, a little bit of paprika and garlic powder, and then this Italian herb mixture (oregano, thyme, basil, garlic, black pepper, tarragon, red bell pepper, chives) and then "fried" it in a little layer of olive oil mixed with a dash of truffle oil.


After adding the gorgonzola to the top of the chicken, I went ahead and threw a lid on the pan for just a couple of minutes with the heat on medium-low to allow the cheese to really melt. I suppose you could also throw the ban under the broiler in your oven for 2 to 3 minutes to get the gorgonzola nice and bubbly, but I would recommend adding the pancetta prior to placing under the broiler. Just be sure to keep a close eye on it!

(I also threw the chicken onto a paper towel for just a minute before plating it to get any extra oil off, but this isn't really a necessary step, especially if you're serving with an arugula base.)


How Sweet suggests combining with a side of rice or salad, and I found that arugula made an excellent addition and took the flavor up somehow even more. Arugula is another really stong flavored ingredient, particularly when raw, but I drizzled it with olive oil and then sprinkled a little salt and some cracked pepper on top and found that it was REALLY good when taken in bites WITH the chicken.


And one last tip: it goes great with Kim Crawford Marlborough Sauvignon Blanc... which is only my favorite wine, ever.


Hope you enjoy!