Wednesday, July 27, 2011

Roasted Potatoes (Bacon & Gorgonzola Edition)

I'm back to rave about another How Sweet recipe. Let's keep this short, simple, and salty... just go make these roasted potatoes right now. Just be sure you spray the foil with the non-stick spray because I forgot and, well, it was a little more difficult to flip them than it should have been.

(I did alter the recipe just a little bit... mainly by just using the purple fingerling potatoes because I saw them and they sounded like fun, and by just using the green onions and not the chives because I didn't feel like buying them.)


Maybe make some sweet corn to go with them...


And then throw them on a plate with something hot off the grill...


And ENJOY!

Tuesday, July 26, 2011

Iced Coffee

I'm a complete coffee addict. Yes, coffee... not caffeine. Though I'm sure the root of the "addiction" is the caffeine, I've never been much of a soda drinker. Coffee on the other hand could be consumed by the gallon as far as I'm concerned.

In the summer, a hot coffee isn't always the most pleasant thing, and neither is driving down the street to pay $5 for an iced Caramel Machiatto from Starbucks. Why not do it yourself at home? I promise it can be just as good!


The key to making a good iced coffee is brewing your coffee REALLY strong. As in, use twice the amount of ground coffee that you would normally use. The first time I tried it I just assumed I could throw coffee on ice and it would taste just as good, and that's not the case. You basically just need to use the mindset that while you are brewing a certain amount of coffee, it has to be strong enough for the "coffee flavor" to spread to the milk/melting ice cubes. Here's the recipe I generally use to make a large mug (about "3 or 4 cups" worth if it was just a regular brew).

2 Cups of water to brew the coffee
4 spoonfuls of coffee grounds
(I use Folger's Black Silk- I like it strong! Basically just double the amount you would use when normally brewing 2 cups of coffee)

1 Cup of Milk
5 or 6 ice cubes
Any sweeteners or flavorings you'd like to add
(For sugar/sweetener, use the amount you would normally use if you had 3 or 4 cups of coffee. If unsure, start with a little bit and add more to taste. You can always add more but can't take it out!)
Sometimes I'll also add a little squirt of caramel or chocolate syrup

Brew the coffee as normal, and then pour into a mug that already had the ice cubes and milk in it. Add sweeteners/flavoring to your liking, and ENJOY! If it doesn't come out perfectly the first time, just take note... I think that with any coffee making you just kind of get the hang of making it how you like it, and your additions to it can always be modified!

Another good part about this is that you don't have to chug it down before it gets cold. I have a tendency of drinking my coffee while I'm running around the apartment getting ready, doing household chores, looking at blogs, etc... this sometimes leaves me forgetting about it, and with the iced coffee it's already cold, so this isn't even an issue!

Monday, July 25, 2011

Cookie Bottomed Cupcakes


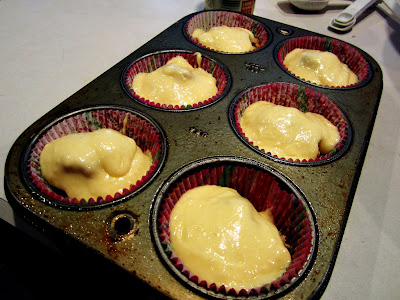
These look like normal cupcakes prior to their frosting, don't they?

Here's the thing: this is a food blog.
So, I'm sure you're aware of this and that since you're reading, you probably like food. And cooking it. Or maybe just making other people cook it for you. Whatever works, I'm not here to judge. If you follow me on twitter, or have seen previous posts, you probably know that I could just about swear by the blog How Sweet It Is. Seriously, I think I'm addicted. If you don't follow her, you really should.

I'll admit I generally stick to her baked goods, just because I tend to cook with things that don't so much require a recipe, or things I can just make up as I go along based slightly off a recipe because it's just easier. (Though she recently posted a recipe for some roasted potatoes I am going to have to do. Soon.) Let me tell you: her baked goods recipes...OUT OF THIS WORLD. Combinations you might not think of, but that may or may not blow your mind. This one is definitely a keeper.

May I present to you: Cookie Bottomed Cupcakes.


Meaning, cupcakes with a slightly gooey cookie baby inside. The best of like, every world. You can find Jessica's original post on them HERE, but I'll post how I made them, using her cookie recipe and a boxed cake mix (a little easier when you're working with multiple batters).

I also am just giving you the recipe for the "double batch of cookies" as she suggested, because it is the perfect amount to make about 24 cupcakes (you'll have a lot of cake batter) and then some extra cookies to use as toppers. You can always half it if you're wanting to make less cupcakes, or not do the toppers. Using half the recipe should make 12 cupcakes and a few cookies to cut up and throw on top.


Cookies:

1 cup butter, softened

1 1/2 cup brown sugar, loosely packed

2 eggs

2 teaspoons vanilla extract

2 2/3 cups all-purpose flour

2 teaspoons baking soda

1/2 teaspoon salt

1 1/2 cup chocolate chips

"Preheat oven to 350 degrees F. Sift flour, baking soda, and salt together and set aside in a bowl.

Beat butter and sugar together in the bowl of an electric mixer until it’s light and fluffy. Add egg and vanilla and beat until combined. Add in dry ingredients and mix until just combined. Fold in chocolate chips. Line a muffin tin with liners and give each a quick spritz of non-stick spray. Using a spoon also sprayed with non-stick spray, press about 1 1/2 tablespoons of cookie dough into the bottom of each liner." (I did this on some, and for others just dropped the same amount of cookie dough in but left it in a ball... this makes more of a "center" than a bottom, but both are delicious!)

Cake:

1 Box of Cake Mix (I used a yellow, butter recipe)

Anything the box mix calls for

Make mix as directed on box. To save the extra dishes, I just made sure the second bowl used in the cookie batter was big enough and then used that for the cake batter once it was empty.

Use an ice cream or cookie dough scoop to drop the batter on top of the cookie. It might be a little bit more full than when you would normally make cupcakes (slightly over a third). If you are doing the "ball of cookie dough", just make sure the cake batter has blanketed the dough. You will probably have extra batter left over even after doing 24 cupcakes, so you can either make plain cupcakes, throw the batter away, or do whatever else you please with it.


Bake at 350 degrees F for 15 to 18 minutes. They should be just starting to turn golden brown on top when they're ready. For the extra cookies, these can be baked at the same temperature for approximately 8+ minutes... just drop them in balls approximately the size of what you put in the bottom of the cupcake tins and keep an eye on them after 8 minutes.


Wait until cupcakes are cooled and then frost with frosting of your choice. I just used a cream cheese frosting. One store bought container should contain just enough to do a decent sized covering on 24 cupcakes. I then cut up some of the spare cookies into sixths and stuck a little piece on top of each one. Voila!


ENJOY!

But be careful if you make the full batch, make sure you have plenty of friends or family to pass the extras along too... they are too tempting to have too many just sitting around in your line of sight. ;-)

In other news, I'm about to move to my dad's apartment in Chicago to work on the job search in the Corporate Event Planning field. This basically means that aside from job searching, I'll be living right by a Whole Foods and having plenty of time to experiment and document recipes. I'm hoping things around here pick up a little as a result. Hope to see you back again soon!

Saturday, July 23, 2011

Cute in the Kitchen: Anthropologie Aprons

A co-worker today brought up Anthropologie aprons, and I have quickly convinced myself I "need" one. How cute are these? You can see the entire collection *here* on the Anthropologie website.

Growing Season Apron: $32

Cuisine Couture Apron: $32

Plate Presentation Apron: $32

Trousseau Apron: $38

I can only assume from my experience with other Anthropologie clothing/other products that the aprons are probably a pretty good quality and absolutely worth $32... assuming you usually cook with things that can be washed out (e.g. not something that would require bleaching). Do you know anyone who owns an Anthropologie apron and would recommend it? I'm strongly considering buying one!


Sunday, July 17, 2011

Restaurant Review: FARMbloomington

Back from another round of laptop problems with a review of a restaurant from Bloomington, IN that I somehow JUST managed to try. FARMbloomington, located on Kirkwood Avenue just off the square, which focuses on using "local foods with global flavors". According to the website, the menu changes seasonally and based on the Chef's inspirations, and from what I experienced it is a pretty diverse menu.

Prices can range from $13.50 for a pizza to $30+ for an entree (though most are in the $20 range), but it is all well worth it! A current summer menu can be found HERE.

We started with the FARMfamous Garlic Fries as an appetizer. I first became totally obsessed with garlic fries when visiting San Francisco, and let me tell you: these garlic fries would make SF proud. They are perfectly crisp, covered in garlic, parmesan, chili flakes, and a Turmeric Aioli and come with a side of garlic mayonnaise for dipping. DELICIOUS! For $8 you can get a large bowl big enough for plenty of people to share!


For dinner I had the Jim Fiedler's Spicy Chorizo Sausage pizza ($13.50). Thin crust, woodstone oven baked with chorizo, jalapenos, grilled onions, spinach, and garlic... also delicious! The flavor combination was really good, and the crispy crust melded with the cheese and was perfectly accented with the little kick of jalapenos. It is definitely not for anyone who doesn't like a little spice! The pizza took up a large plate, but as I said was a very thin crust. I ended up taking about half of it home after the garlic fries, but without an appetizer it is a pretty good sized portion.


My brother had the FARMbeef Burger ($15) which was truly the largest burger I have ever seen! It was served on what looked like French Bread and with a red-potato salad. He added Goat Cheese and Bacon, and the flavor combination was fantastic... I know because I might have snuck a little bite ;-)! My dad did the Thai-Tamarind Grilled Pork Chop ($22), pictured below, which can be found on the menu linked above, and absolutely raved about it.


If you're ever in Bloomington and looking for a unique, nice, and absolutely delicious restaurant I highly recommend giving FARMbloomington a try. FARM also has a market & cafe and a bar on top of the restaurant. Find out more HERE. I only wish I had caught a picture of the inside of the restaurant, as it is done in a very homey but open "farm house" feel. I guess you'll just have to check it out for yourself!