Tuesday, November 15, 2011

Hello, Sweet Tooth

Don't get me wrong, I love most things dessert related, but I just don't have the world's biggest sweet tooth. When I do get cravings for sweets they're usually random and easily taken care of with as much as a bite of chocolate. Tonight, however, I've been looking through FoodGawker and I have never before encountered SO MANY good looking dessert recipes. Maybe more specifically so many chocolate-based-recipes. You would think that Triple Chocolate Gelato this afternoon would have settled my chocolate cravings for at least a week...

But really, it would be rude of me to not share these with you.

 
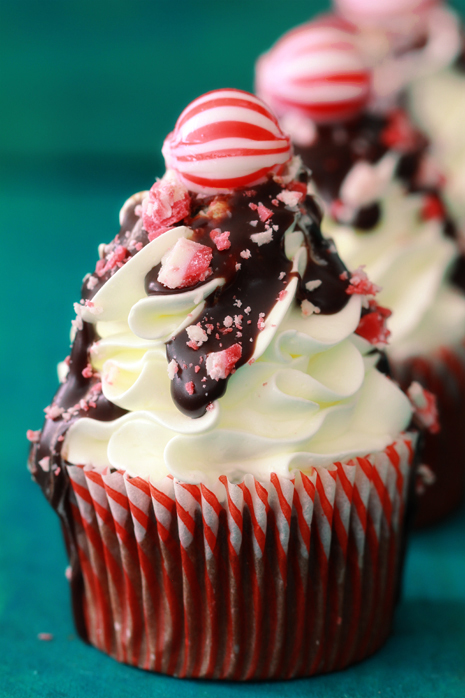
Peppermint Mocha Cupcakes from Bakers Royale
 (Yep, like the Starbucks drink. Only, I don't like my coffee to be THAT sweet. My cupcakes? Definitely.)

 Irish Car Bomb Cupcakes from See Brooke Cook
("Mmmm Bailey's... creamay!" This one just looks so cute and classy. And what you probably don't know is that there is a little chocolate ganache baby hiding in there. You can't ever go wrong with chocolate ganache.)

 Drinking Chocolate from Fields of Cake
(Does anyone else remember when Starbucks had this stuff for a brief period of time? You don't need anymore than a shot glass sized amount but it is SO GOOD.)

 Salted Caramel Chocolate Mug Cake from The Family Kitchen
(Whoa, what? 2 minute cake? If that's not good for random sweet tooth cravings I don't know what is.)

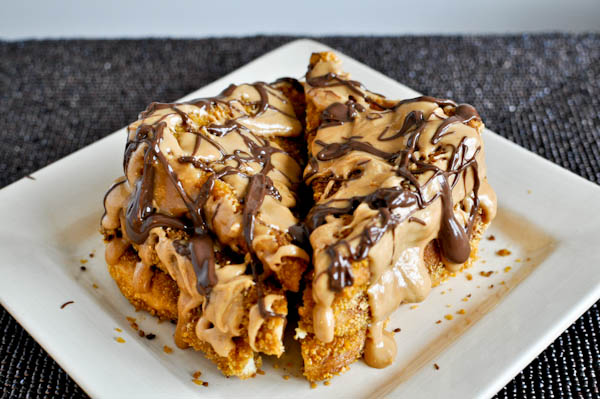
 Crispy Chocolate Peanut Butter French Toast from... big surprise, How Sweet It Is
(I should have known the second I saw this it had her name written all over it. Yum.)

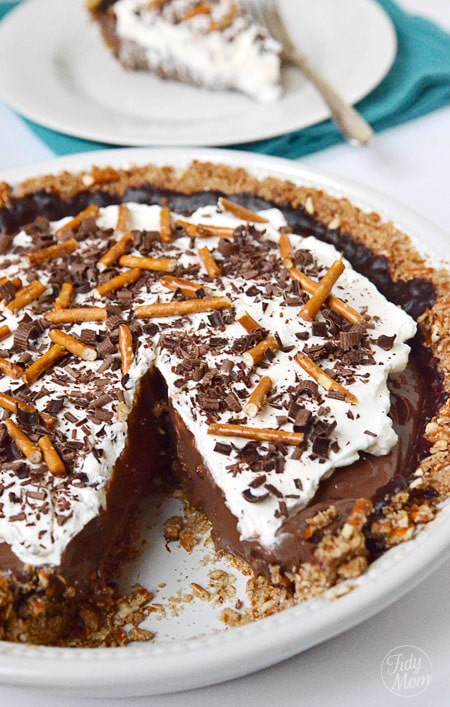
 Chocolate Pretzel Pie from Tidy Mom
(I will be making this for Thanksgiving festivities... assuming I can wait until then!)

Sorry if your mouth is now watering. I should know better than to look at FoodGawker any time other than right after a much-too-large meal has been consumed. I think I have said this before but really, it's about as smart as going to the grocery store on an empty stomach and without a list. 


And yes... I did just reference Old Greg up there.

Tuesday, November 8, 2011

Pumpkin Cupcakes with Chocolate Ganache and Spiced Cream Cheese Frosting


Link
These were a BIG hit and might just be one of the best cupcake recipes I've ever made. I found the frosting recipe here on Cooking Classy, but I wanted to use a different recipe for the cupcakes that didn't use buttermilk or applesauce, which I didn't have at home. I'm not a big Martha Stewart fan, but I have to give it to her that this pumpkin cupcake recipe was DELICIOUS.

The overall process is a little time consuming, though you can do things simultaneously... such as making the frosting while the cupcakes are baking. I don't recommend making the ganache until all cupcakes are out of the oven and cooling because it needs to be put on right after making it.


Cupcake Ingredients and Recipe

2 cups all-purpose flour
1 teaspoon baking soda
1 teaspoon baking powder
1 teaspoon coarse salt
1 teaspoon ground cinnamon
1 teaspoon ground ginger
1/4 teaspoon freshly grated nutmeg
1/4 teaspoon ground allspice
1 cup packed light-brown sugar
1 cup granulated sugar
1 cup (2 sticks) unsalted butter, melted and cooled
4 large eggs, lightly beaten
1 can (15 ounces) pumpkin puree

  1. Preheat oven to 350 degrees. Line cupcake pans with paper liners; set aside. In a medium bowl, whisk together flour, baking soda, baking powder, salt, cinnamon, ginger, nutmeg, and allspice; set aside.
  2. In a large bowl, whisk together, brown sugar, granulated sugar, butter, and eggs. Add dry ingredients, and whisk until smooth. Whisk in pumpkin puree.
  3. Divide batter evenly among liners, filling each about halfway. Bake until tops spring back when touched, and a cake tester inserted in the center comes out clean, 20 to 25 minutes, rotating pans once if needed. Transfer to a wire rack; let cool completely.
(While the cupcakes were cooling, I poked some holes in the top with a chopstick to help them cool and also allow a little space for the ganache to get into the cupcake.)


Ganache Ingredients and Recipe


1 cup semi-sweet chocolate chips
1/2 cup heavy whipping cream

Original directions: "Place chocolate chips in a medium mixing bowl, set aside. In a small saucepan over medium heat, bring whipping cream just to a boil. Pour hot cream over chocolate chips and whisk until smooth. Spoon 1 tsp ganache over each cooled cupcake and spread near edges, allow to cool. Meanwhile make spiced cream cheese frosting."

(I always do ganache in a glass bowl set on top of a pan with boiling water that does not touch the bowl's bottom. Just put the chocolate chips in and when they start to melt, add the cream and stir frequently until everything is melted and combined. I then transferred it all into a measuring cup to easily pour onto each cupcake immediately.)


Spiced Cream Cheese Frosting

8 oz cream cheese, softened
1/2 cup unsalted butter, softened
1 tsp vanilla
1/8 tsp salt
4 cups powdered sugar
1/2 tsp cinnamon
1/8 tsp nutmeg

"In a large mixing bowl, with an electric mixer, whip together cream cheese and butter until fluffy. Add vanilla, salt, powdered sugar, cinnamon and nutmeg and whip until smooth and fluffy. Pipe cream cheese frosting over cooled chocolate ganache covered cupcakes."

If you don't have any fancy piping equipment, it's ok! I have a set of the plastic cake frosting tips you can just buy in a 4-pack from the store in the baking aisle (they're intended for those tubes of frosting you can buy) and I cut a hole in the corner of a Hefty ziplock bag and wedge the tip in. Start with a smaller hole and cut more as necessary, you want to try to make it airtight.

I sprinkled some cinnamon over the cupcakes afterwards as a little bit of a garnish, though the original frosting recipe used chopped pecans.

ENJOY!


Sunday, October 23, 2011

Lemon Pepper Crusted Chicken

First, let me apologize for the fact that there's only one picture, and that it was taken with the camera on my phone. I'm not going to lie, I've been looking forward to trying this ever since someone mentioned a similar recipe on Twitter a few days ago. Waiting around for a food photo shoot was the last thing I wanted to do when this was plated and ready to be eaten.

Furthermore, I don't think I can quite get across how easy this recipe is. Chances are you probably have half of the stuff to make it already in your house, too. This recipe serves two but can easily be multiplied to however many you need... it's another one of those where the amount of each ingredient doesn't really matter.


Ingredients
2 Boneless Skinless Chicken Breasts
Approximately a half cup of Mayonnaise
Grated Parmesan Cheese
Spices of your choice- I went with garlic powder and chilli powder
Panko Lemon Pepper Bread Crumbs

Directions

Preheat oven to 350 degrees.

If your chicken breasts are thick, pound them out a little. I didn't have a meat pounder (I'm sure that's the official term...) at our apartment in Chicago so I just kind of hit them a bunch with the bottom of my fist while they were still in their package.
(Who says you need classy tools to cook!?)


Mix mayo, some grated parmesan cheese, and a hefty sprinkling of garlic and chilli powder together. Sorry these aren't more official terms, but use as much or as little as you like. You don't want the mixture to get TOO thick so just add a little at a time where the cheese is concerned.

Coat one side of a chicken breast at a time with a little covering of the mayo mixture and then cover in bread crumbs. Flip and do the same, then repeat with the other chicken breast.

Put chicken breasts on a slightly greased (or buttered, or olive oiled, whatever you have on hand) pan. If you have a broiling pan, these are ideal so the bottom doesn't get soggy. You could also just use a wire rack on top of another pan, or any other contraption you can come up with. We don't need to be too technical with this one.

Bake at 350 for approximately 40 minutes until the chicken feels firm ( or "done"- just cut one open to check if you need to) and the bread crumbs are golden brown. I put them in for 15 and then flipped them over and left them in the rest of the time on the other side. You might want to turn the broiler on for 5 minutes or so towards the end just to make them a little bit more golden, but that's really just for visual appeal.


And TA-DA! Super moist on the inside and crunchy on the outside, this chicken is ready for you to eat! We had it with a serving of linguine with a homemade alfredo and then some lemon pepper sauteed broccoli and peppers, but you can serve it with just about anything: roasted potatoes, mashed potatoes, baked potatoes, any other kind of pasta, pasta with red sauce for a "chicken parmesean" of sorts, rice and vegetables... whatever suits your tastes!

ENJOY... I sure did!

Thursday, October 13, 2011

Denver in (Food) Pictures

I just returned to Chicago yesterday after what seems like an all-too-short trip to Denver. As usual, one of the highlights of the trip was the opportunity to try some great new restaurants. Here's a picture recap of some of the amazing meals of the trip from two of the restaurants we were able to check out, Panzano and The Berkshire (Both happen to place emphasis on sourcing locally).

Panzano

With contemporary Northern Italian cuisine embodying the Italian motto "Those who eat well, live well," downtown Denver's Panzano has been named among the city's top 5 restaurants and has a mouth-watering menu slightly outside of what you might expect at a typical Italian restaurant. Trying to pick just two of the entrees proved to be a challenge, but we ended up with the Carbonara a la Panzano with shrimp and a special featuring a rosemary cream sauce and house-made lamb sausage, finishing with the Tiramisu which utilizes champagne instead of rum for a delectable twist on this classic. (Not pictured is the FABULOUS grilled Caesar salad which involves a 10 second toss on the grill of the romaine for a slight smokey flavor.)


The Berkshire

This pork-starring restaurant in the Stapleton area serves an array of comfort food and traditional sandwiches with a little bit of extra pizazz. The Berkshire was yet another restaurant where we could have easily ordered half the menu. In a blue cheese craving I settled on the Bacon and Blue Cheese stuffed burger served on Ciabatta with the most amazing and perfectly crispy fries, and also had the opportunity to try a bite of the pulled pork sliders. The Berkshire not only serves lunch and dinner but also has a special brunch menu. Check it out for yourself on their website.


I'm looking forward to *hopefully* becoming a Denver resident in the next few months and in turn being able to explore the menus of both Panzano and the Berkshire a little more thoroughly and see what else the city has to offer.


Friday, October 7, 2011

West Side Nut Club's Fall Festival

It's that time of year again: Evansville's West Side Nut Club's Fall Festival. It's known for being the "2nd largest street fair" in the country or something like that, but it goes along with the fact that Evansville has been recognized as being the most overweight city in the country in that you can get deep fried ANYTHING at this fest.

You can also get just about any kind of weird food you could imagine: brain sandwiches, pickle juice slushies, kangaroo, alligator on a stick, fried kool-aid... you name it. I tend to take the safe route, though last year I did make a brief attempt at a sucker with a scorpion inside. Pretty sure it got stuck in my hair or something like that before I actually got to the scorpion, but I'm sure I would have wussed out anyways.

Deep fried cookie dough... yum!

Twisted Tea for the girls and beer for the boys

Fried green beans

Chicken fried bacon


"Deep fried thin mints"... though it seemed more like a thin mint trapped inside a donut ball.

The best policy is really to go with a group of people and just try little samples of everything everyone gets. I wasn't feeling it as much this year and didn't get too wild or eat all that much, because all the "fried" really gets to you after a while. Definitely worth checking out if you're ever bored the first week of October and within easy travel distance... or if you're someone who is really attracted to the idea of eating Turkey Testicles or a Brain on a bun. *gag*

Read more about the Fall Festival in posts from last year here or here.

Or, if you're feeling really adventurous, look at the entire "Munchie Map" to see every last thing the Fall Fest has to offer here.


Thursday, September 22, 2011

Mushroom Alfredo

Official Business: I just updated the URL for Wonderland Kitchen, and you can now get here from AlexsWonderlandKitchen.Blogspot.Com. I'm not sure if this affects anyone following via the Google Reader, but just wanted to let everyone know!


I never liked Mushrooms before this year. I could tolerate them if they were cut up really tiny in something, or if I didn't know they were there, but I just had a general distaste for their slippery texture. (Yes, 9 times out of ten it is the texture and not the taste that makes me not like a food) On my New Years Resolution of "trying new things" primarily where food is concerned, I ordered a Mushroom Alfredo dish at Mama Carolla's in Indianapolis. OH MY GOD was it good. It was really finely chopped and super creamy and smooth, and SO GOOD. I knew I had to make it for myself. I think this was the start of my mushroom acceptance.

While I have never figured out quite how their sauce was so grey or hit it quite on the head, I've made about a million different versions and they're all pretty good. Another benefit: it's pretty hard to mess up. You can use just about any kind of mushroom, any kind of seasoning, any kind of meat/pasta combination... you get the gist. Here's a recipe for the most recent version I did using Pancetta. This can be substituted with bacon, or if you don't want to use that at all you can just add a little bit of olive oil to the butter when you saute the mushrooms/garlic/onion.

Ingredients
1/4 lb diced pancetta (or bacon)
1/2 cup diced white onion
1 1/2 cups mushrooms of your choice
(I've used baby bellas, button, shitake... pretty much anything works)
2 Tbsp butter
1 Tbsp minced garlic
1 Cup heavy cream
1/2 cup shredded parmesean or Italian Mix cheese
Chili Powder
Salt and Pepper
Pasta of your choice
(I prefer any with more shape than just spaghetti/linguini to let the sauce get into all the little crevices. We used fresh Rigatoni from our local Italian market.)

Start by cooking the diced Pancetta or bacon in a skillet. If using Pancetta, keep in mind that it doesn't get quite as brown as bacon and don't overcook it or it will burn! Pancetta usually leaves less grease too, so just leave the drippings in the skillet. If the bacon leaves enough where you can easily spoon it out, remove some and leave just about a tablespoon in the pan.

(Now is also a good time to get your water boiling for the pasta in a separate pot.)


Add the butter to the skillet (and olive oil if you're not using the pancetta/bacon). Put the mushrooms in and let them cook for a few minutes. During this time you can dice the onion and then throw it in. Add the garlic. Cook until mushrooms become "squishy" when touched with the spoon and onions are becoming translucent. It's best if they're soft enough that you can kind of cut through them with the spoon. This generally will take around 10 minutes on medium high heat. About halfway through you'll want to get your pasta in if you're not using fresh pasta, which only takes a few minutes to cook.


Put the mushroom mixture into a food processor. Add about a 1/2 cup of the heavy cream at a time and blend. How much you blend it is really up to you... you can leave it chunky or keep breaking it down until it is more smooth and creamy. The color of the mixture will vary depending on the type of mushrooms you use. Add more of the heavy cream if necessary.


Once broken down to your preference, return to the skillet and add remaining heavy cream. You can always add more heavy cream than listed in the ingredients to get it to a consistency of your choosing, just add a little bit at a time to make sure it doesn't get too thin. Cook on medium-low heat while stirring for a few minutes, then add the 1/2 cup of cheese and mix in. At this point you can add salt and pepper to taste, and the same with the chili powder if you want to give it a little bit of an extra kick. I also added about 2/3 of the pancetta and mixed it in, leaving the rest for garnishing.


Add the pasta to the mixture and stir to evenly coat.


Plate the pasta and garnish with extra shredded parmesean/italian mix cheese and pancetta.


ENJOY!

Tuesday, September 20, 2011

Arugula Asiago Pesto and More Must-Tries


It's that time again. I find a must-have-immediately recipe on How Sweet It Is, make it, post pictures, and tell you how good it is while wondering why anyone in their right mind wouldn't be following her yet. Oh wait, I know- because just about every post she does is must-have-immediately which isn't always great on the waistline... but just about always good on the taste buds.

So let's mix it up today. Here are some pictures of the Arugula Asiago Pesto from How Sweet (that I actually made weeks ago, several times within a few days, and have just forgotten to post about) along with the link to that and a few other recipes I'm dying to try. The Arugula Asiago Pesto itself is SO easy to make. SOOOOO easy. I love pesto but was always under the impression it was more difficult to make. This is the fastest thing to throw together on pasta, and the flavor combination and the way the Asiago melts when combined with the warm pasta... Yum!


I just sauteed bite-sized chicken pieces tossed in a mixture of flour, salt, pepper, and spices of your choice (Rosemary, Oregano, Chili Powder, Garlic Powder, anything Italian- all good options. Hell, use them all at once!) in some olive oil and minced garlic until cooked through and then tossed them on top of the pasta. Super easy way to cook chicken- I do this to add to more meals than you could even imagine.

How Sweet It Is- Arugula Asiago Pesto

Lemons and Anchovies- Potato Broccoli Soup

The Comfort of Cooking- Basil Pesto Potato Salad

How Sweet It Is- Roasted Red Pepper Penne

The Way the Cookie Crumbles- Dulce de Leche Cupcakes

Ami's Vegetarian Delicacies- Green Beans Spicy Stir Fry


Do you have any recipes you have seen lately that you are just dying to try? Do share!


Monday, September 19, 2011

Margie's Candies

While a friend was visiting Chicago from St. Louis this weekend, we decided to finally go to Margie's Candies in Bucktown for "lunch" since we had both heard of it and never been. It's a super old fashioned ice cream and candy shop, and was totally delicious.

Sundaes are around $5-$7 and are ENORMOUS. We both got our own, and thank god had not eaten lunch, because neither of us finished them. "Two scoops" is really more like three, and you get an entire side of fudge with your sundae in most cases.


I got the Grandpa's Turtle Sundae, which has two scoops of ice cream (flavors of your choice- I did Chocolate and Praline), caramel, a side of fudge, whipped cream, a wafer cookie, peanuts, a cherry, and a turtle (the candy) on top. It was kind of funny because a family sitting behind us must have ordered one of the turtle sundaes and upon receiving it loudly proclaimed "WELL THIS DOESN'T LOOK LIKE A TURTLE AT ALL!" It might not have looked like a turtle, but it was really good.

"Sooooo full!"

If you're looking for ice cream in Chicago, a fun family outing, or just have an incredible sweet tooth, definitely check this place out.

Wednesday, September 14, 2011

Paula Deen's Biscuits

Break out the butter, we're making some Paula Deen biscuits, ya'all!

(Oops. Didn't actually get any pictures until most of the biscuits had been put onto plates.)

I've been wanting to make home made biscuits for a while, but I always thought it would be more complicated than it actually was. I think I just tend to avoid bread because of the thought of yeast, or kneading, or letting it rise, or anything along those lines. This recipe from the Food Network was actually really simple.

Ingredients

2 Cups all-purpose flour
1 tsp sugar
1 Tbsp baking powder
1 tsp salt
8 tablespoons butter, cubed (the tinier the better!)
3/4 cup milk

Directions

Preheat oven to 350 degrees F.

Combine all dry ingredients in bowl and mix together. Cut butter into mixture until it is fairly spread out throughout the flour mixture. Don't worry if it's not totally mixed in, I found it was easier to just knead it all together after adding the milk.

Add a little of the milk at a time and knead together, making sure to get all of the flour and work the butter into the mixture.

Flour a section of your (clean) counter, and you can now roll out the dough into the desired thickness and use a cookie cutter to cut biscuits, or just eye ball it and tear off sections. I divided the dough in half and then made four little balls out of each half and kind of pressed them down onto the flour to flatten them out a little bit. The recipe claims that it makes 3 dozen biscuits, but I'm not sure where that came from... you should get 7 or 8 big fluffy biscuits out of it.

Butter a skillet and place the biscuits in the skillet. Bake at 350 degrees for 20-25 minutes. You can brush or drizzle with a little bit of melted butter a few minutes before they are done to get a more golden look to them.

Use as you please! Today I used them for biscuits and gravy. I'd give you a gravy recipe, but I'd be lying if I said I measured out ANY part of that. I will tell you I used a pound of "Hot" ground sausage, milk, flour, a tablespoon of bacon grease, salt, and pepper.

(Biscuits and gravy always taste better than it looks, doesn't it?)

ENJOY!

Tuesday, September 13, 2011

Red Potato Soup


It's officially fall: today I whipped up a big ol' pot of home made potato soup. I had never actually made it before, but I found this recipe for creamy red potato soup and it turned out really well!

I made just a few changes:

*I added a large diced carrot into the mix at the beginning, a little bit extra beyond the 4 cups of potatoes, and about an extra 1/4 cup of chicken broth to make up for the extra ingredients.

*Once I put the pot on to simmer, I started cooking some bacon and then added two tablespoons of the bacon grease into the chicken stock/simmering mixture to give it a little extra flavor.

*I used 1 cup of milk and a 1/2 cup of Heavy Cream instead of just milk. I think this makes it a little creamier and eliminates the need for any flour.

*I only used about 1 cup (half a bag) of the shredded cheese. I think if you have the extra on hand and just use it for garnish, it's plenty.

*I filled up our mini-food processor with a few spoonfuls of the soup AFTER I put the milk in and whipped that. It came out looking like mashed potatoes, and then I put it back in and mixed it up. As suggested in the recipe, using this method helps make it partially creamy and still partially chunky.


Enjoy!