Thursday, June 28, 2012

Taco Joint

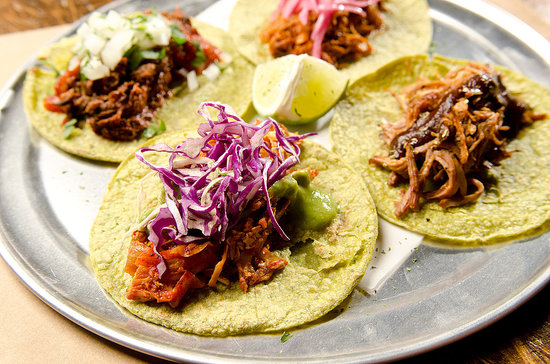
Living with two other foodies has made moving back to Chicago quite the adventure. We've been revisiting several of my favorite places and trying out as many new restaurants as possible. One of our new favorites for delivery/carry out is Taco Joint. I have yet to try a single thing off the menu that was not amazingly delicious, and overall the prices are very reasonable. (We're talking $2-$3 per taco, and each taco is fairly large and VERY filling! Though be prepared to pay a $5 delivery fee if you go that route.) 


I wish I had some of my own pictures to show you, but truth be told carry out containers aren't always the most appealing visual presentation, and that would also require us not digging in the second we get them open. Yeah, it's that good. I'll have to let a few pictures I've pulled from the web suffice for now.


Some of our favorites:

Arabe ($3): Grilled Puebla style Lebanese influenced taco with marinated pork loin and chipotle salsa; served on a Mexican style pita

Estilo Baja ($3): Victoria Beer battered tilapia garnished with a creamy-arbol cabbage slaw

Tinga ($2): Marinated shredded chicken garnished with red cabbage and “guaca-salsa”

Queso Fundido ($7): Melted Chihuahua cheese, roasted poblano strips and choice of homemade chorizo or sautéed mushrooms

And of course, we would whole-heartedly recommend ALL of the guacamole options. What can I say, we're really into guac. Each one comes with corn, sweet plantain, and malanga chips.  


For those dining in, Taco Joint also has over 50 tequilas and a menu full of margarita options. We will absolutely be trying the in-restaurant dining experience in the near future to try some of those out!

Taco Joint is located in Lincoln Park at 1969 N. Halsted in Chicago, right off of W. Armitage Avenue.

Visit their website for menus and hours.


Monday, April 23, 2012

Peanut Butter Chicken

You know that crispy peanut butter chicken you can often find on Chinese buffet tables? This is it. Or... a very close approximation of how to make it yourself.

 (Recipe adapted from this one)

Ingredients
1.5 lbs boneless chicken cutlets
3/4 cup milk
3 Tbsp. creamy peanut butter (or maybe a little more)
1 egg
Salt and pepper
Approximately 2-3 cups crushed Corn Flakes
Vegetable/Canola Oil

For Sauce
1/2 cup creamy peanut butter (or maybe a little more)
3 Tbsp. soy sauce
3 Tbsp. brown sugar
3/4 cup water (can reduce or adjust to get the thickness desired)
Drizzle of honey

Whisk together the milk, 3 tbsp of creamy peanut butter, and egg. Sprinkle in a few dashes of salt and pepper. Soak your chicken in this mixture for a few minutes while you get any other prep done (I did this while getting the carrots and broccoli ready to steam and starting the rice). 


While chicken is soaking, put all sauce ingredients in a glass measuring cup or other microwavable container. You might want to start with 1/2 cup of water and add more later to reach your desired consistency. Microwave this mixture for 30 seconds and then whisk to thoroughly combine. Microwave another 30 seconds until hot. At this point you can add more water if necessary to make the mixture a little thinner. This can be done ahead of time and just reheated when the rest of the meal is ready.


Coat soaked chicken pieces in Corn Flakes and cook in oil, flipping once, until browned on both sides and cooked through.


Serve with rice & veggies of your choice and drizzle with peanut butter sauce. ENJOY!


Wednesday, April 18, 2012

Dinner at Madeleine's

Saturday was my 23rd birthday, and my go to spot for birthday dinners in Evansville, IN is a fusion restaurant called Madeleine's. The menu changes monthly, and I have yet to go and try something that wasn't amazingly delicious. 


 Avocado and Crab Salad appetizer

 Duroc Pork Chop with Dijon Mushroom Sauce, Hericot Verts, and Roasted Fingerling Potatoes


You can check out Madeleine's and their current menu by visiting their website (here). The menu they have up now is for the most part what they had this weekend, with a few minor changes. In a town with minimal fine dining options, this place is likely to continue being a favorite in our family.

(Note: Both the appetizer and entree I tried were changes on the menu, and I wish I could remember what the aioli was on top of the Avocado and Crab Salad because it was DELICIOUS!)


Monday, April 9, 2012

Harvest of Louisville

Last weekend I went down on an overnight trip to Louisville with my parents to look at apartments for my dad while he is working there. On Friday we went to lunch at Harvest, a locally grown restaurant, on East Market street. I'm always a little turned off when a restaurant has a very small menu, especially when the choices seem to be a little out of the ordinary, but this turned out to be DELICIOUS. 

We all got the burger either with different toppings or different sides, and it was one of the most amazing burgers I have ever had. It is served on a pretzel bun with chevre, lettuce, and bacon jam (pretty much just bacon). I chose the herb dijon potato salad as a side, and it might have been the best potato salad I've ever had. I would definitely recommend checking it out if you're ever in town and looking for a new place to try. I know I'll be back on what I'm sure will be many trips to come. 


You can check out Harvest and their menu here.

Thursday, March 22, 2012

Raspberry Chocolate Cupcakes


I was looking for a new cake recipe to make for a friend I'm visiting this weekend who just celebrated her birthday. I wanted to do a chocolate base and started browsing through recipes incorporation various fruits. I came across this recipe from Taste of Home and originally wanted to make it in a smaller version but was not able to find smaller pans and decided to alter it a little for cupcakes.

The recipe, when made into cupcakes, will make approximately 36+ regular sized cupcakes. I will be passing these along to everyone from the birthday girl to my little brother and his dorm friends!

Ingredients

Cake
3 Cups Sugar
2 and 3/4 Cups All Purpose Flour
1 Cup Unsweetened Cocoa
2 teaspoons Baking Soda
1 and 1/2 teaspoons Salt
3/4 teaspoon Baking Powder
1 and 1/4 Cups Buttermilk
3/4 Cup Canola Oil
3 teaspoons Vanilla Extract
3 Eggs
1 and 1/2 Cups Strong Brewed Coffee (room temperature)

Frosting
8 Ounces Low Fat Cream Cheese
1/3 Cup Butter (softened)
1/3 Cup Unsweetened Cocoa
2 or 3 Tablespoons Black Raspberry Liquer*
Approximately 4 Cups Confectioners Sugar**
1 teaspoon Hot Pink Gel Food Coloring (optional)

(*the original calls for Raspberry Liquer, I had black on hand. I also added quite a bit more than the original recipe so the flavor would really stand out)
(**more or less may be needed... add a cup at a time until you reach your desired consistency)

Extras
4 Ounces Semisweet Chocolate: melt in microwave safe bowl and pipe into shapes on wax paper with a frosting bag/small tip. Allow to cool and harden.
(It helps to throw them in the freezer after they are mostly hardened.)

Red or Black Raspberries for topping


"In a large bowl, combine the first six ingredients. Combine the buttermilk, oil and vanilla; add to the dry ingredients. Add eggs, one at a time, beating well after each addition; beat for 2 minutes. Gradually add coffee (batter will be thin)."

Pour batter into cupcake liners, about 2/3 full, and bake for approximately 20 minutes at 350 degrees. Cupcakes are done when a toothpick inserted into the center comes out clean.

If you are doing the chocolate decorations, now is a good time to do them to give them time to harden while you let the cupcakes bake and get the icing ready.


In a medium to large bowl, beat the cream cheese and butter until smooth. Add in cocoa and raspberry liqueur. Beat in one cup of powdered sugar at a time until frosting has reached desired consistency. If it gets too thick, add a SMALL amount of milk to loosen it up.

After it is mixed to your preferred consistency, add any food coloring. It took quite a bit of the pink gel food coloring to really give it a deep pink color with the chocolate (despite reducing the cocoa amount), but I think purple would show up even better. Frost cupcakes as desired and add chocolate toppings and raspberries.


ENJOY!

Monday, March 19, 2012

St. Patrick's Cupcakes

I've been a nanny the last few months for a family with 3, 6, and 9 year olds. I'm always looking for new ideas for crafts and activities to do with them, and thought decorating green cupcakes would be fun for St. Patrick's Day. I baked them prior to the older kids getting home from school (This time I just added green food coloring to a regular yellow boxed cake mix) and got all of the sprinkles, icings, and decorating gel ready while the younger one was napping.


The kids loved the decorating even more than getting to eat the cupcakes! I decorated a few along with them to give them some ideas, but they did a great job coming up with their own as well. This is a great activity for kids of any age and can easily be customized to different holidays with different food colorings and decorating supplies!


Tuesday, March 6, 2012

Rolo Stuffed Cookies

This is kind of a SUPER belated Super Bowl food post. But more importantly it's also a post in which I am going to pass along a DELICIOUS cookie recipe to you from Sarah over at West Coast Wife Life. Behold: the Rolo Stuffed Chocolate Chip Cookie.


Oh yeah, they're as delicious as they sound. I recommend making them immediately. They're totally worth unwrapping 50 individual Rolos by hand. (Or maybe there's some place you can buy them already unwrapped, but if there is I missed that one.)

You can find Sarah's recipe for these little babies by clicking here.

The rest of the Super Bowl food lineup included the usual suspects: Guacamole, Sausage Cheese Dip, Grilled Wings, Mini Pigs in Blankets, a plethora of assorted chips, and my dad's Pork Chili. Oh... and the Better than Crack Brownies. Not sure how those slipped my mind for the initial list. If you're a veteran reader of this blog (or How Sweet It Is) you know how addictively good THOSE are.


Lily ate a little bit of everything but I think it was pretty clear to everyone that the Doritos were her favorite part.


Ok but seriously, go make those Rolo cookies now.

Tuesday, February 21, 2012

Everyone Needs This....


Do you have something that looks like this? No? You should.

This meat mallet/tenderizer is my new favorite thing. I've used it plenty of times before, but I've recently discovered the difference it makes with chicken. If you use the flat side to pound the absolute hell out of a chicken breast before cooking it (whether baking, pan searing, whatever) it makes it SO TENDER AND SOFT.

Seriously, do it. Just spread your chicken between saran wrap and beat the hell out of it until it's the desired thickness for whatever you're making. You'll thank me later.

Saturday, February 4, 2012

Food Inspiration

I happen to believe that a grilled cheese sandwich made with sour dough bread is about as good as a grilled cheese sandwich is going to get. Clearly it can get even better:


Caprese Grilled Cheese from Yammie's Noshery


I'm going to need to make that, REAL soon.